Application of the mass spectrometry methodology is the best solution for industrial leak testing, due to its satisfactory sensitivity and the rapidity with which testing can be carried out.
It is a question of establishing whether a product is acceptable or not, even when one does not determine the point or the quantity of leakage. The critical factor is duration of test, which, in many cases, must not exceed tens of seconds. System calibration is conducted by means of a calibrated leak produced especially for the system.
The leak is calibrated to ensure reference to national samples. A software product developed specifically for this purpose enables automatic system management and constant system monitoring. This means the operator can check the measurement cycle and also indicate onset of malfunction or the need for maintenance. The software product also enables storage of data pertaining to processed products in order to ensure traceability.
Following design and production, testing system characteristics are set: sensitivity, repeatability, machine factor, and time constant specifications. Lastly, calibration is carried out, after which the acceptance threshold value is set.
System sensitivity consists in minimum leak detectable according to test configuration. It is obtained by connecting to the test chamber a leak the value of which is equal to that set as product acceptance threshold value. Repeatability is obtained by repeatedly performing the measurement cycle while recording the mass spectrometer signal corresponding to the helium mass.
The machine factor is the relation between the flow measured with a calibrated leak directly linking with the leak detector and the same leak directly linking with the product tested and placed in the chamber for measurement. The time constant of the system is the time required to attain stabilisation of the spectrometer signal. The test process may last just a few seconds. In this time, the object to be tested must be emptied beforehand to enable pressurization of this object with a gas concentration which is specified, constant and uniformly distributed.
At the same time, the chamber for measurement is evacuated, after which, following detection and quantification of helium present, the pressure is discharged from the object and the chamber for measurement is returned to atmospheric pressure.
Frequently, apart from leaktesting, another pressure test is also conducted with simple dry air or nitrogen as a means of stress-testing the product, subjected to a sharp increase in pressure. During the process, pressure-step pressurization therefore takes place, plus maintenance (albeit for very brief periods of time) of the maximum pressure with detection, via falls in pressure of macro-leaks (if present), thereby enabling test cycle abort and anticipation of signal indicating bad part, followed by used-gas pressure discharge and unit evacuation in preparation for the next helium pressurization process.
With such brief times, one cannot wait for the system to attain stable equilibrium conditions in the analytic chamber before carrying out measurement. The system is therefore set up in such a manner that, during the measurement stage, and with a wait of no more than a few seconds, the signal generated by the calibrated leak is detected, leading to bad part mode for the machine. In brief, a signal is detected which corresponds to the intensity of the peak of the mass of helium with the spectrometer, which is much lower than that which would correspond to the state of equilibrium reached in the analytic chamber after a prolonged period of time (specified by time constant).
If measurements, conducted repeatedly, indicate satisfactory repeatability of signal, times being equal, this signal is set as the part threshold for acceptance/rejection of the product in the chamber.
The relation between saturation flow of the calibrated leak, as directly read by the spectrometer, and the signal, corresponding to the bad part threshold set in the analytic chamber, is the machine factor. Thus, the function of the industrial testing machine is to effect acceptance/rejection selection in the manner of a go/no-go gauge.
The condition of measurement attained at a point of the saturation curve, and not for the value of saturation itself, and the consequent ‘setting’ of measurement to when the set threshold is exceeded, prevent determination of the real value of the leak flow that leads to rejection. In other words, measurement is the rejection threshold.
The flow value which is, in the eventuality, read after a certain period of time is still a function of the entity of the leak inducing it. However, it is greatly affected by the speed of reaction of the system: of the electronics involved in signal transformation, of the mechanics of closure of the measurement valve, etc. The recorded flow value therefore merely provides a value that is indicative in nature (not a representative value for storage).
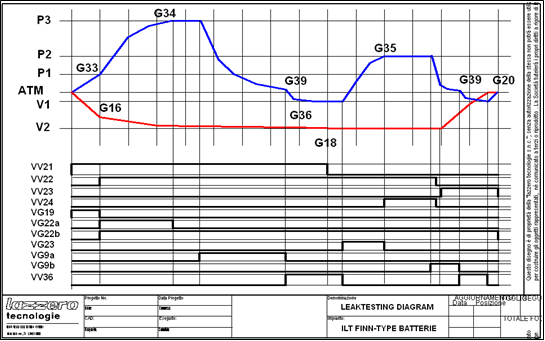
In the following figure, we have an example of the testing cycle for heat exchangers. In the upper part of the figure we have pressure trend as a function of time (blue line, pressure trend for tested object; red line, pressure trend in analytic chamber during cycle stages). The lower part of the figure presents the valve logic states (open/closed).

The graph presents the stages of pressurization of the object. Starting out from atmospheric pressure, pressure with intermediate controls G33 and G34 is attained. If the object presents no big leaks the pressurization is maintained for some seconds, followed by the discharge stage (G39), evacuation (G36) and helium pressurization (G35). During this stage, in which, in the measurement chamber, the limit vacuum has been attained (G18), measurement takes place of the flow corresponding to the set threshold. Lastly the measurement chamber and the tested object are returned to atmospheric pressure.


